Rescript With React: Routing and Navigation
Introduction
I have been working with Rescript for a couple weeks, now, and I continue to love the language and am at the point where I whole-heartedly recommend it. This article is a follow-up to my previous article marrying create-react-app to rescript. In this article we’ll design a navigation bar and attach it to a router.
Patreon
This series takes a lot of time to write and maintain. I’ve started it while I have some free time between jobs, but I’ll probably need some extra motivation to keep working on it once I’m busy with work again.
I’m not one for begging for money on the Internet, but if you’re interested in providing some of that motivation, I’ve set up a Patreon account. I thank you for your support.
As a bonus for patrons, articles will be published there at least two weeks before they make it to my public blog.
Other articles in series
With over a dozen articles and counting, I’ve created a table of contents listing all the articles in this series in reading order.
Designing our app
We’ll be building on the base developend in the previous article that ported the default create-react-app to rescript. If you haven’t been through that article you can clone the cra-intro branch to begin. The routing-nav contains the commits from this repo. You may find it helpful to follow along in github so you can see how the js files that are output by the rescript compiler are impacted by the changes in the rescript code.
I’ve decided to develop a recipes app for this series. Are you as tired of todo apps as I am?
The features we’ll give it include:
- Add a recipe with:
- title
- ingredients
- instructions
- tag a recipe with a string value
- View all tags
- View individual recipes
I’m not covering all that today; this will take a few articles. In this one, we’ll focus on the routing and navigation component.
Routes
Rescript’s built-in pattern matching is ideal for handling routes. Rescript-react gives us a handy tool to extract the route in a matchable format. It’s super lightweight, so if you ever felt react-router was too heavy and opinionated, you’ll love this. (Of course, react-router, like all Javascript libraries, is available to you if you prefer it).
First, let’s think about what routes our recipe app will need:
/is a homepage with navlinks for the rest of the routes/recipes/addcreates a new recipe/recipes/<title>is a link to a specific recipe/tagsshows a list of recipes by tag
Our existing App.res can be the container component, but we’ll replace the
whole thing with the following:
@react.component
let make = () => {
  let url = RescriptReactRouter.useUrl()

  switch url.path {
  | list{"recipes", "add"} => <div> {React.string("Add Recipe")} </div>
  | list{"recipes", title} => <div> {React.string("View Recipe " ++ title)} </div>
  | list{"tags"} => <div> {React.string("All tags")} </div>
  | list{} => <div> {React.string("Home page")} </div>
  }
}
First, RescriptReactRouter is a module provided by the
@rescript/react
package. Note that we don’t have to import it. We could have used
open RescriptReactRouter. This would make useUrl available inside our
namespace but that gets kind of hard to follow, so use open sparingly.
RescriptReactRouter contains a few functions; the one of interest to us here is
the useUrl hook. url.path is a linked list. Linked lists are relatively
uncommon in procedural languages, but are very popular in functional languages.
This is just because they’re a little more ergonomic for certain kinds of
mutations. However, in Javascript, linked lists are less performant than
arrays, so you’ll probably find you don’t use them a ton.
The syntax list{} is Rescript syntax to construct or destructure (in this
case, we are destructuring) a linked list.
The switch statement in Rescript is used for simultaneous pattern matching
and destructuring. We saw it used with Option in the previous article. We
can match on list{"recipes", title} and have the title automatically assigned
to a variable that is available to us after the fat arrow. Each “arm” of the
switch statement matches a different pattern.
You’ll also note that there is no return statement in the function. The
“result” of evaluating the switch is whichever “arm” was matched. And the
“result” of a function is the last expression in the function It has the effect
of calling return at each of the matching arms.
That should cover all the cases, right? But actually it doesn’t!
The rescript compiler kindly warns us You forgot to handle a possible case here,
and even gives us an example. We forgot the “default” case when someone
visits an unexpected page. We should have some sort of 404 behaviour. Neither
Javascript nor Typescript would have caught this minor, but important,
oversight.
The solution is easy: add a final case to the switch as:
| _ => <div> {React.string("Route not found")} </div>
And that’s it: your router is complete. Start the compiler if you need to
(npm run start:res if you followed the previous article). It may not be necessary
if your editor is building files for you as part of the linting process. You’ll
also need to start the React devserver.
Try visiting these urls:
- http://localhost:3000/
- http://localhost:3000/recipes/add
- http://localhost:3000/recipes/5
- http://localhost:3000/tags
- http://localhost:3000/not_found
Creating a component: NavBar
Let’s create a new navigation bar component. It will have links for “home”, “tags”, and “recipes” to hit the relevant urls in the router. Needs to match the url to know which nav link to highlight as “active”.
Create a new file named src/NavBar.res. I’m just putting them all in the src
directory, as this is an exploratory repo and I’m not too concerned about
organization. This file is going to have two components in it:
NavButtonNavBar
We’ll use the concept of modules to distinguish between them. Every file is a
module, but you can nest modules inside files using the module keyword.
Start by knocking together a basic NavBar component:
 @react.component
 let make = () => {
   let url = RescriptReactRouter.useUrl()

   let selected = switch url.path {
   | list{"recipes", ..._} => "Recipes"
   | list{"tags", ..._} => "Tags"
   | _ => "Home"
   }

   <div> {React.string(selected)} </div>
 }
This should look a bit familiar. We define a react.component with a make
function, just as we did in the previous article with App. It returns a
simple div with the contents of the selected url. The url is extracted using
the same pattern matching we saw in the routing section. The only new syntax
is the ..., which says “The list could be longer than this, but we don’t care
about the other components.” So, list{"recipes", ...} matches any url that
starts with /recipes, including /recipes/ and /recipes/bacon.
The result of the switch expression gets assigned to the selected valiable.
For instant feedback, adapt theApp.res, which contains the routing logic
so it can render a NavBar:
  @react.component
  let make = () => {
    let url = RescriptReactRouter.useUrl()

    let component = switch url.path {
    | list{"recipes", "add"} => <div> {React.string("Add Recipe")} </div>
    | list{"recipes", title} => <div> {React.string("View Recipe " ++ title)} </div>
    | list{"tags"} => <div> {React.string("All tags")} </div>
    | list{} => <div> {React.string("Home page")} </div>
    | _ => <div> {React.string("Route not found")} </div>
    }

    <div> <NavBar /> {component} </div>
  }
Instead of being returned directly, the output of the switch is now assigned to a component variable.
The returned div contains both a <NavBar /> and the component.
Note again that you don’t have to expressly import the NavBar file.
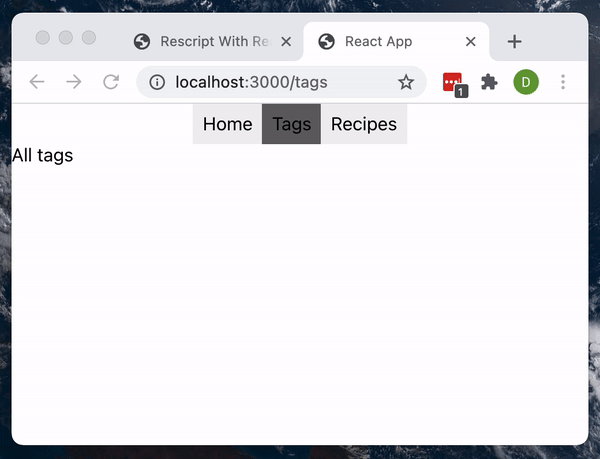
Now, if you visit, for example localhost:3000/tags, you should see the selected path and the component below it.
Navigation Buttons (links)
We don’t just want to render the selected element though; we need links! For
that, we’ll need a new component. A NavBar will have three <NavButtons>
- Home
- Tags
- Recipes
In addition to rendering text and a clickable link, NavButton needs to switch
styles depending on whether it is the selected tab.
Here is the code (place it at the top of NavBar.res)
module NavButton = {
  @react.component
  let make = (~name: string, ~selected: string, ~linkTo: string) => {
    let style = if selected == name {
      ReactDOM.Style.make(~backgroundColor="#656565", ~padding="1ex", ())
    } else {
      ReactDOM.Style.make(~backgroundColor="#efefef", ~padding="1ex", ())
    }

    <div style={style} onClick={_ => RescriptReactRouter.push(linkTo)}> {React.string(name)} </div>
  }
}
This is our first component that accepts react properties. You’ll note that the
NavButton is a new module “inside” the existing NavBar module.
The make function in this module accepts three properties: name,
selected, and linkTo. The ~ in front of each property tells us that the
property must be passed as a named property. As with Typescript, each
property gets assigned a type, although, (surprisingly), you could leave the
types off. Rescript is able to soundly figure out the types from their use
inside the function. I like to use them for legibility, though. The compiler
isn’t the only thing that needs to read this code. It will complain if it
can’t figure it out or you use them incorrectly it is completely soundly typed,
even with such powerful type inferencing.
We check whether the currently selected tab is the one being rendered
The “output” of the if statement is assigned to a style variable.
Yes, even if is an expression that “returns” a value.
Inline styles are crafted as named properties to ReactDOM.style.make
This function is strongly typed, and Rescript will only accept valid properties.
The () unit as the last argument to ReactDOM.style.make is weird.
It tells rescript there are no more named properties. I’m unclear on why this is necessary. Here’s what the Rescript docs have to say on the subject:
Note for the sake of the type system, whenever you have an optional argument, you need to ensure that there’s also at least one positional argument (aka non-labeled, non-optional argument) after it. If there’s none, provide a dummy unit (aka ()) argument.
but I don’t know why the type system needs that. It sure seems to be able to infer everything else!
The onClick callback requires an argument (the javascript event). Since we
don’t need it, I assigned it the default argument name, _.
The main purpose of the component, changing the url component, can be done with
RescriptReactRouter.push.
Here’s the Git
Commit
with the NavButton
Incoporating NavButton into NavBar
Now we can add three NavButtons to the default NavBar component we made
earlier. Edit the component to look like this:
@react.component
let make = () => {
  let url = RescriptReactRouter.useUrl()

  let selected = switch url.path {
  | list{"recipes", ..._} => "Recipes"
  | list{"tags", ..._} => "Tags"
  | _ => "Home"
  }

  <div style={ReactDOM.Style.make(~display="flex", ~justifyContent="center", ())}>
    <NavButton name="Home" selected={selected} linkTo="/" />
    <NavButton name="Tags" selected={selected} linkTo="/tags" />
    <NavButton name="Recipes" selected={selected} linkTo="/recipes/add" />
  </div>
}
We’ve added a style to the div using ReactDOM.style as we did previously.
Don’t overlook the ending (). I can tell that like the | symbol on the
match arms, this is gonna be one of those things I always forget!
We pass properties to the NavButton component just like normal JSX.
Git
commit
for the updated NavBar
Now if you visit http://localhost:3000 you can see your new navbar. It should look like this:
That’s all for today. Here’s the branch for all the commits in this article.
In the next article, we’ll create redux-style state management, boilerplate-free using Rescript’s functional awesomeness!
