React Redux Firebase With Firestore Tutorial
Whenever I start a new hobby web project, I just want to jump in and start coding.
Instead, I spend many many hours trying to get authentication to work. I’ve got half a dozen half-finished “boilerplate” projects lying around that were supposed to satisfy the desire of, “next time, I can use this boilerplate and authentication will just work.” It never does.
One thing I know I don’t want to do is manage my own auth database anymore. It’s too risky, and keeping a Django (for example) instance patched and up-to-date is more devops overhead than I’m interested in.
That left me with third-party services. I trust Facebook the most, so I invested a lot of time trying to get Facebook login working. That didn’t go so well. There’s a huge irony that the company that created React does not integrate it well with their own login mechanism. And once I got it working on the frontend, I had a hell of a time getting it integrated with whichever backend (usually asyncio) I was experimenting with at the time.
I gave up and turned to auth0. They have terrific SEO, and their JWT introduction microsite is marketing genius. But I never found that the reality matched their hype. It says right on the front page, “Implement Easily,” and yet, I have probably invested a cumulative two weeks of my life (months and months of calendar time, littered with unfinished projects) trying to get it to work reliably with various frontend and backend frameworks.
My most recent attempt was using Firebase. It was amazing. My React app was up and running with authentication in under five minutes. I figured, “hey, let’s give this whole serverless thing a whirl” and went all in. No backend at all. It continued to be amazing. I had data going into and out of a database within 10 minutes. That’s less time than it takes me to remember how to set up a new database on a local postgres instance.
Firebase is great for hobby projects because it’s free until you scale, which I don’t expect to do. And if I ever do want to scale it into a startup, there’s no devops involved. I’m willing to pay Google for that, if the need ever arises.
However, I found that actually hooking firebase up to redux required more boilerplate than I wanted. Well, no problem there. There’s a terrific library called react-redux-firebase that integrates extremely well with redux.
The library is well-supported and actively developed. It’s even quite well documented. But I found it took longer to understand how to use it than it needed to. The documentation assumes that you already know how to use Firebase, and it has a separate library if you want to use Firestore, Firebase’s “second edition” database. The documentation between the two libraries is a bit uneven, and I just kept getting caught in corner cases that I don’t want to get caught in again. I’m also not a fan of the “functional react components” used in the react-redux-firebase documentation; I prefer proper ES6 classes. Untangling that gave me an extra layer of indirection every time I wanted to understand something.
What the react-redux-firebase library really needs is a tutorial. This is it.
Prerequisites
- You’ll need to know your way around React and all its prerequisites (html, css, javascript, etc).
- I assume you have a basic understanding of the philosophy behind Redux. You don’t actually need a lot of experience with Redux, since the library we are using handles a lot of the nasty bits. You don’t even need
redux-thunk - You do not need to have much familiarity with firebase itself. I don’t. That’s the point!
The example
I’ve gotten intensely bored with sites using todo lists and chat applications as examples, and I’m guilty of both. For this tutorial, I’m presenting an expense tracking application, as for a business trip. The app will contain two main data models, a category, and an expense, where each expense is assigned to a category.
There is a github repo for this project. I committed after each major change so you can see a diff of the changes.
Get started
First, initialize a react app and remove all the cruft (I apologize for calling tests “cruft” for the purposes of this tutorial):
yarn global add create-react-app@next  # I'm using @next to get create-react-app 2.0.0
create-react-app expense_tracker_tutorial
cd !$
rm public/favicon.ico public/manifest.json
rm src/*.css src/App.test.js src/logo.svg
rm README.md
Reduce the src/App.js so it doesn’t depend on the removed files (also remove the index.css import in src/index.js):
//src/App.js
import React, { Component } from 'react'

class App extends Component {
  render() {
    return <div>Hello World</div>
  }
}

export default App
Install some dependencies:
yarn add \
    firebase \
    redux \
    react-redux \
    react-redux-firebase \
    redux-firestore
Now yarn start should be successful and you can do the whole live-dev thing.
Set up Firebase and Firestore
Hit up https://firebase.google.com and sign up for an account. Once you get to the console, you’ll see an “add project” button. Click that. Fill out the ‘Add a project’ form as you see fit.
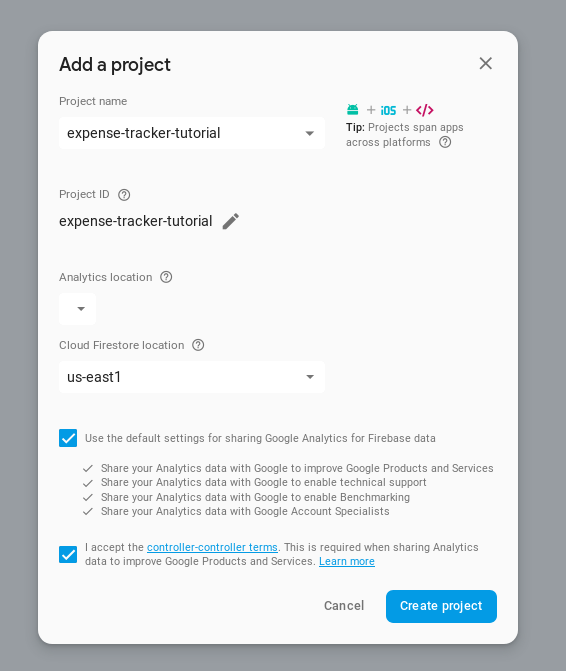
Really only Project name needs to be touched. I set the firestore location to us-east1 because it’s geographically closer to me.
Hit Create Project and wait a minute, followed by Continue. Now click the Auth badge:
![]()
followed by Set up sign-in method.
Enable at least one sign-in method. Personally, I always use Facebook, but choose the one you’re most comfortable with. I’m avoiding E-mail/Password for this tutorial because it requires an extra Sign up component that I don’t want to code.
If you do want to use Facebook, you’ll need to:
- In a new window (keep the firebase configurator open), sign up to https://developers.facebook.com/ and create a new App
- Click Set Up for Facebook Login under Add a Product
- Click Web
- Enter https://localhost:3000 as the Site URL and click Save, then Continue
- Click Settings then Basic in the side bar
- Copy the App ID into the Firebase Auth config screen where you enabled Facebook
- Click ‘Show’ under App Secret and copy that into the Firebase Auth config screen as well
- Under Products, click Facebook Login, then Settings
- Copy the Redirect URI from the Firebase Config window into the Valid OAuth Redirect URIs box in the Facebook Login settings. Then save changes.
Other auth providers will have a very similar flow.
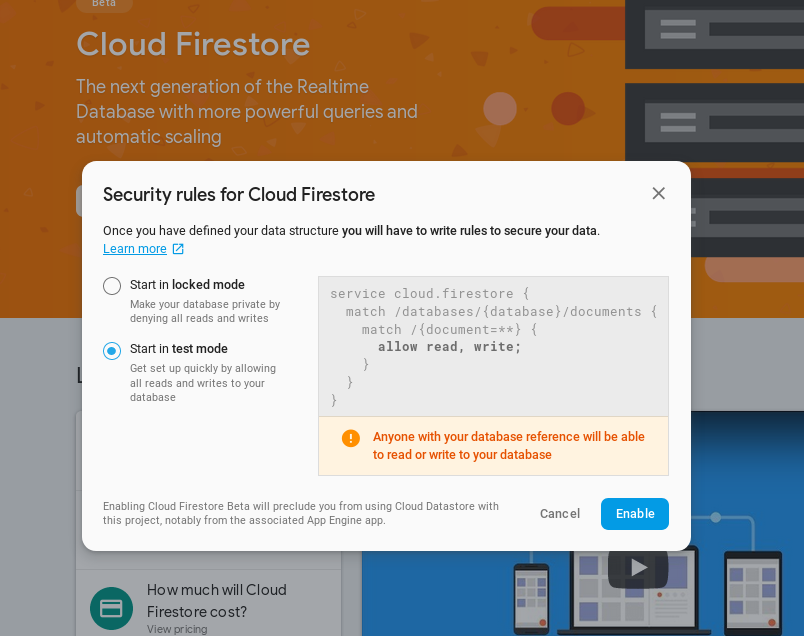
Save your firebase settings and click Database in the left sidebar. It pressures you to set up a Firestore database, but you also have the option of choosing the older Firebase Realtime Database. React-redux-firebase can handle both, but for this tutorial, create a Firestore database.
Select Start in test mode and then Enable. You’ll set up security rules later. They’re about the most annoying thing about Firebase, so I’m deferring it until after you’ve finished more interesting stuff.
Configuring react-redux-firebase
In the firebase web console, hit the ‘gear’ icon beside Project Overview and then Add Firebase to your web app. You don’t need the whole script tag, but copy the contents of the config object into a new file src/firebaseConfig.js in your project folder. Name the variable firebaseConfig and export it as follows:
//src/firebaseConfig.js
const firebaseConfig = {
  apiKey: "<redacted>",
  authDomain: "expense-tracker-tutorial.firebaseapp.com",
  databaseURL: "https://expense-tracker-tutorial.firebaseio.com",
  projectId: "expense-tracker-tutorial",
  storageBucket: "expense-tracker-tutorial.appspot.com",
  messagingSenderId: "<redacted>"
}

export default firebaseConfig
Start configuring your redux reducers in a file named src/redux/reducers.js as follows:
//src/redux/reducers.js
import { combineReducers } from 'redux'
import { firebaseReducer } from 'react-redux-firebase'
import { firestoreReducer } from 'redux-firestore'

export const initialState = {}


export const rootReducer = combineReducers({
  firebase: firebaseReducer,
  firestore: firestoreReducer,
})
All the state that comes from firebase or firestore will be available in those two reducers. They are connected to all the queries you make on the firestore instance. You’ll still need to add your own reducers for local state, but you won’t need to do network queries inside redux thunks in order to update any server-side state.
Now let’s set up the redux store. This requires adding enhancers to set up the firebase and firestore listeners, so it’s a bit complicated. But it’s one of those files that, once you have it in place, you won’t have to think about it again. It’s not really necessary to understand everything that’s going on, but I’ll try to hit the highlights.
Open src/redux/store.js and start by adding the following imports:
//src/redux/store.js
import { createStore, compose } from 'redux'
import { reactReduxFirebase } from 'react-redux-firebase'
import { reduxFirestore } from 'redux-firestore'


import firebase from 'firebase/app'
import 'firebase/auth'
import 'firebase/firestore'

import firebaseConfig from '../firebaseConfig.js'
import { initialState, rootReducer } from './reducers'
The initialState and rootReducer are the ones you just wrote in reducers.js.
Important Note: (It took me a long time to figure this out, so I’m highlighting it). The two unnamed firebase imports are required in order to tell Firebase to initialize authentication and firestore. Firebase has a whole bunch of components and you don’t want to pull them all into your bundled JS. In this case, you’re just using two components. If you expand your firebase usage and want to use, for example, their storage or functions features, you may need to add other imports here.
Still in store.js, you should next initialize the Firebase and firestore apps.
firebase.initializeApp(firebaseConfig)
firebase.firestore().settings({ timestampsInSnapshots: true })
The firebaseConfig is the one you defined earlier by copy-pasting the configuration from the firebase console. timestampsInSnapshots is there because firestore threw a huge warning in the firefox console claiming the API is changing and telling me I should add it. I don’t know what it does, but it shuts the warning up.
Now comes the magic. Configure the react-redux-firebase components that will go into the redux enhancers:
const enhancers = [
  reduxFirestore(firebase),
  reactReduxFirebase(firebase, {
    userProfile: 'users',
    useFirestoreForProfile: true,
  })
]
This configures the react-redux-firebase and redux-firestore libraries. These redux enhancers will be passed into the redux store to make sure that all the listeners and actions are hooked up so data shows up in the two reducers we defined later.
The userProfile configuration option says, “name the firestore collection that contains information about a user users”. The userFirestoreForProfile option tells react-redux-firebase that the collection should be stored in your Firestore instead of an older Firebase Realtime database.
The next part is optional; I use the redux dev tools extension extensively, and highly recommend it. If you want to use it, use this code to put one more enhancer on the stack if you’re doing local development:
const reduxDevToolsExtension = window.devToolsExtension
if (
  process.env.NODE_ENV === "development" &&
  typeof reduxDevToolsExtension === "function"
) {
  enhancers.push(reduxDevToolsExtension())
}
All that is left is to create the store wrapped in all these enhancers:
const composedEnhancers = compose(
  ...enhancers
)

const store = createStore(rootReducer, initialState, composedEnhancers)


export default store
I know this section was long, but really, you just need to copy-paste the whole file and you’ll be good to go.
Authentication
I made a src/components/AuthButton.js component that highlights how react-redux-firebase interacts with a react component. If the user is logged in, it shows a log out button, otherwise it renders a log in button.
Here are the imports and PropTypes:
//src/components/AuthButton.js
import React, { Component } from 'react'
import PropTypes from 'prop-types'
import { connect } from 'react-redux'
import { compose } from 'redux'
import { firebaseConnect, isLoaded, isEmpty } from 'react-redux-firebase'


class AuthButton extends Component {
  static propTypes = {
    auth: PropTypes.object,
    firebase: PropTypes.shape({
      login: PropTypes.func.isRequired,
      logout: PropTypes.func.isRequired,
    }),
  }
The auth object contains information about the authenticated user. It comes directly from the firebase reducer you set up in reducers.js earlier. The firebase PropType is provided by the firebaseConnect function and contains simple functions for logging in and out. All you have to do is call these functions and let firebase take care of the hard parts.
The render function for this button checks for three states: logged-in, logged-out, and “still finding out”:
  render() {
    if (!isLoaded(this.props.auth)) {
      return null
    }
    if (isEmpty(this.props.auth)) {
      return (
        <div>
          <button
            onClick={
              () => this.props.firebase.login({ provider: 'facebook', type: 'popup' })
            }
          >Log in with Facebook</button>
        </div>
      )
    }
    return <button
      style={{ width: "20rem" }}
      onClick={() => this.props.firebase.logout()}
    > Logout</button >

  }
}
The isLoaded helper function provided by react-redux-firebase returns false if it has not yet completed all the async requests to see if the visitor is logged in or not. isEmpty is similar, except it knows the data has arrived and the user is unauthenticated.
For this component, if no data is loaded, it returns null. If the user is not yet logged in, it renders a button that has its onClick handler plugged into the login function provided by the react-redux-firebase tutorial. Otherwise it renders a button that calls the analogous logout function.
The login function can take a ton of options. My preference, as I mentioned is to use Facebook login. When the button is clicked, it passes through to Facebook to authenticate me and ask permission to share data about me with the application. Google, Twitter, GitHub, and the other Firebase providers behave similarly.
You can also use e-mail and password login using this method, but you’d need to supply input boxes to fill them, and you’d need to create an analogous sign-up action.
Finally, hook the component up to both firebase and the redux store using higher order components:
const mapStateToProps = state => {
  return { auth: state.firebase.auth }
}

const mapDispatchToProps = {
}


export default compose(
  connect(mapStateToProps, mapDispatchToProps),
  firebaseConnect()
)(AuthButton)
mapStateToProps is exactly the same as in a normal redux app. It’s pulling the auth information in from the firebase reducer. There’s a ton of information in this object, by the way. You may want to console.log it from inside the render method if you want to see what’s available, or you can check it out in the redux devtools extension.
The firebaseConnect() call is the most interesting part of this code. It is doing a ton of work for you behind the scenes. It’s giving you access to the firebase object that has the login and logout methods. More importantly, it sets up listeners when the component is mounted or updated to make sure that your local redux store updates in response to changes in the firestore server.
Finally, you can update the src/App.js to add the redux Provider and a reference to the new AuthButton:
//src/App.js
import React, { Component } from 'react'
import { Provider } from "react-redux"

import store from "./redux/store"
import AuthButton from "./components/AuthButton"


class App extends Component {
  render() {
    return (
      <Provider store={store}>
        <AuthButton />
      </Provider>
    )
  }
}

export default App
Now you can log into the app. Assuming you already had yarn start running, you can head to localhost:3000 and see the login button. Click it and grant your app permission in Facebook (or whatever auth provider you prefer). The page button should switch to “Logout” once the flow is complete.
The button widget is obviously quite ugly. If you’d like some social authorization buttons that you can hook up these listeners, I’ve found react-social-login-buttons easy to use.
The first time this worked for me, I gleefully clicked that log in and log out button over and over. So many of my other authentication library attempts had failed. And getting this working took me far less time than it took to write it out for you.
Submitting data to firestore
We already have all the plumbing in place to connect a component to firestore. In the next step, let’s add a React component that knows how to add data to the firestore database. But first, a very quick overview of the firestore data-model:
Firestore is a document-oriented database. It is divided into Collections. Each collection can contain multiple Documents. A document can contain multiple key value pairs. Keys are strings, values can be most types of primitives as well as a nested collection. Note that unlike a relational database, any document in the collection can have a different set of keys from other documents in the same collection. In practice, I’d expect most documents in a collection to be similar, although there may be optional keys in some cases.
There is already one collection in your firestore database. The Database tab in the left sidebar of the Firebase console gives you a graphical browser of the Firestore data:
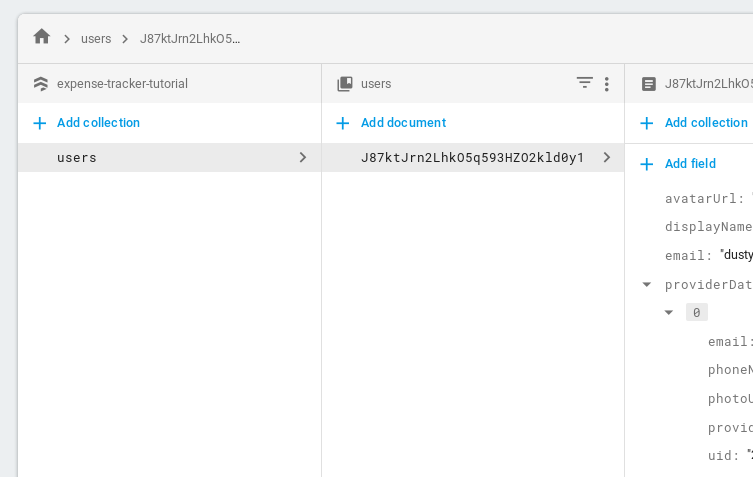
In the left column, you can see there’s already a users collection. This is named after the userProfile configuration setting you passed in reactReduxFirebase in store.js. Note that having this show up in your firestore database requires that you had set useFirestoreForProfile in the configuration.
There should already be one document in that collection for the user you logged in as when you set up auth. The key-value contents of that document will vary depending on which provider you used.
The next collection you’ll create is for categories. Each expense that a user adds to the app needs to be categorized. For example, if you were tracking a business trip, you might have categories for “meals”, “taxis”, and “hotels”.
Any one document in the categories collection will only need to have two fields: a userid so that different users can be associated with different lists of categories, and a string name for the category. Adding a new category requires only a text-input box and a submit button. Create a new src/components/AddCategory.js component. It has the normal imports, as well as a new one, firestoreConnect:
//src/components/AddCategory.js
import React, { Component } from 'react'
import PropTypes from 'prop-types'
import { connect } from 'react-redux'
import { compose } from 'redux'
import { firestoreConnect } from 'react-redux-firebase'
firestoreConnect is a higher order component that will be composed with the redux connect function. Be cautious with your imports: this is not the same firebaseConnect component that you used in the AuthButton. It serves a similar purpose, but it’s connecting to firestore instead of firebase.
I initialize the propTypes and state as follows:
class AddCategory extends Component {
  static propTypes = {
    uid: PropTypes.string,
    firestore: PropTypes.shape({
      add: PropTypes.func.isRequired
    }).isRequired
  }
  state = { category: '' }
I use react state instead of redux state because it’s attached to a text input that will never be accessed outside this component. It didn’t seem worth the effort to set up an extra reducer for it.
The uid will come from the redux state managed by react-redux-firebase. The firestore object that contains an add function (among others, but they aren’t needed for this component) will be provided by firestoreConnect.
The render method for this component looks about the way you might expect:
  render() {
    if (!this.props.uid) return null

    return (
      <div>
        <input
          type="text"
          value={this.state.category}
          onChange={(evt) => this.setState({ category: evt.target.value })}
        />
        <button onClick={(evt) => this.addCategory()}>Add Category</button>
      </div>
    )
  }
}
If there is no uid, it means the user is not logged in and we don’t want to render anything. Otherwise, render an input field connected to the state we initialized earlier. Finally, connect the button to an as-yet-undefined addCategory method. This method is the one that actually kicks off the transactions to add the document to firestore (put it before render in the class):
  addCategory() {
    this.props.firestore.add(
      { collection: 'categories' },
      {
        uid: this.props.uid,
        name: this.state.category
      }
    )
    this.setState({ category: '' })
  }
This creates a new JSON “document” with appropriate uid and name attributes. It submits this document to firestore to be added to the collection named categories. After it’s done that, it clears the text input box.
The firestore property has a fairly extensive API. I’ll show you a handful of the methods in this tutorial, but won’t go into all the details. The most important ones are set, update, and delete.
Note that in addition to the API provided by the redux-firestore library, the entire firestore API as provided by the Firebase team is also available, if you ever need more advanced features.
Finally, hook up the redux props and firestore connection:
const mapStateToProps = state => {
  return {
    uid: state.firebase.auth.uid,
  }
}

const mapDispatchToProps = {}


export default compose(
  connect(mapStateToProps, mapDispatchToProps),
  firestoreConnect(),
)(AddCategory)
The same firebase.auth reducer that you used for AuthButton contains a uid field. The compose call wraps the AddCategory component in connect and firestoreConnect. This is similar to the two components for the AuthButton, but note again that this time you’re using firestoreConnect, not firebaseConnect. It’s even possible to use both wrappers if you need to!
the same two higher order components used for AuthButton, ensuring a connection to firestore and the redux store.
You can temporarily add <AddCategory /> to the render method on the App to test it out. Make sure you’re logged in, type a value into the box, and hit the Add Category button. Switch over to the firebase console Database tab and refresh the page. You should see a new categories collection with a single document containing the name and uid that you created:
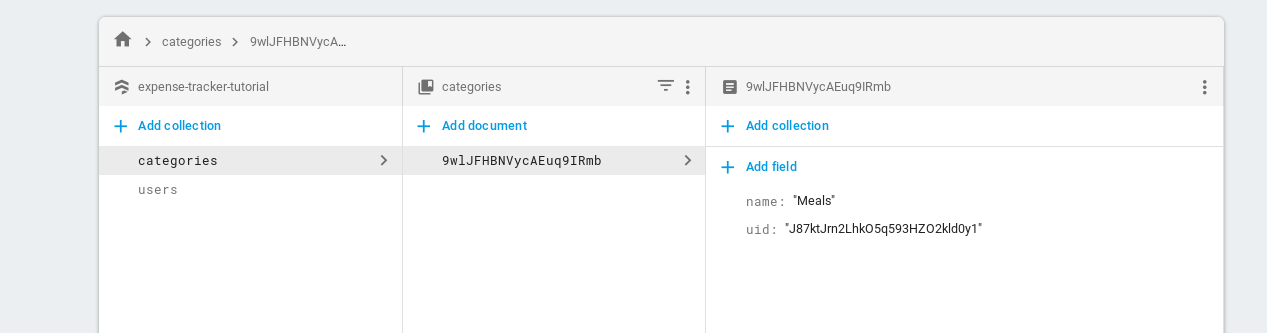
Note that the random looking string in the second column is an automatically generated identifier for that document. The uid is the same as the id of the document in the second column of the users collection for your logged in user.
Here’s a cool firestore feature: While you have the Database tab open to the categories collection, add a new category through your new app. You should see the category automatically show up in the firestore UI.
Retrieving data from firestore
Data needs to flow both ways. We can create a new component that renders a list of the categories for the currently logged-in user. The component also uses firestoreConnect, so the imports look very similar to the AddCategory component:
//src/components/CategoryList.js
import React, { Component } from 'react'
import PropTypes from 'prop-types'
import { connect } from 'react-redux'
import { compose } from 'redux'
import { firestoreConnect } from 'react-redux-firebase'

import AddCategory from './AddCategory'CategoryList is going to render the AddCategory, so I imported it as well.
The PropTypes are very simple:
class CategoryList extends Component {
  static propTypes = {
    uid: PropTypes.string,
    categories: PropTypes.arrayOf(PropTypes.string)
  }
The uid is supplied the same way it was for the previous component. In addition, we’ll have access to a list of string category names as selected by firestore.
Add a simple method to render each category name:
  renderCategory(category) {
    return <div key={category}>
      {category}
    </div>
  }
The render method calls that method for each name in a map and adds the AddCategory component:
  render() {
    const categoryItems = this.props.categories.map(
      (name) => this.renderCategory(name)
    )
    return (
      <div>
        <div>
          {categoryItems}
        </div>
        <AddCategory />
      </div>
    )
  }
}
Then mapStateToProps grabs the same uid state from firebase. In addition, it has to retrieve the category lists from the reducer connected to firestore. This list will be populated by a query set up in firestoreConnect for this component. You’ll see the code in a minute.
const mapStateToProps = state => {
  return {
    uid: state.firebase.auth.uid,
    categories: state.firestore.ordered.categories ? state.firestore.ordered.categories.map(c => c.name) : [],
  }
}

const mapDispatchToProps = {}
That categories line needs some breaking down. First, it is checking if state.firestore.ordered.categories even exists. If it doesn’t, it probably means that the data hasn’t been loaded into the redux store from firestore yet, and we just return an empty list.
If the key does exist, it will include the whole document, including the name and the uid. We only need the name, so a map call converts each element to the string.
I don’t know why the API requires the .ordered part, but I’ve just come to accept it. The data returned from firestore always shows up in the redux state as state.firestore.ordered even though I didn’t specifically order the query. There’s a state.firestore.data object as well, but it doesn’t seem to hold the data I queried.
Lastly, hook up redux and firestore, just as you did for the AddCategory component. This time, however, also tell firestoreConnect about the query to the categories collection:
export default compose(
  connect(mapStateToProps, mapDispatchToProps),
  firestoreConnect((props) => {
    if (!props.uid) return []
    return [
      {
        collection: 'categories',
        where: [
          ['uid', '==', props.uid]
        ]
      }
    ]
  }
  )
)(CategoryList)
firestoreConnect is now accepting a function that passes the current props into it. It returns a list of firestore query parameters. In this case, there is only one query. We’re searching the categories collection for any categories that have the same uid as our logged in user.
If there is no logged in user (probably because the authentication hasn’t loaded yet), we return an empty set of queries.
You can update src/App.js to render the new component:
//src/App.js
import React, { Component } from 'react'
import { Provider } from "react-redux"

import store from "./redux/store"
import AuthButton from "./components/AuthButton"
import CategoryList from "./components/CategoryList"


class App extends Component {
  render() {
    return (
      <Provider store={store}>
        <div>
          <AuthButton />
          <CategoryList />
        </div>
      </Provider>
    )
  }
}

export default App
Behind the scenes, redux-firestore is setting up appropriate listeners on the given collection when the component is created, mounted, and updated. Whenever the collection changes, it automatically updates the redux store. That means that when you add a new category it will automatically update the list on your behalf. Firestore is a realtime database. Any changes that happen in the database (such as a category being added) are immediately updated in the redux store. And when the redux state changes, your component automatically redraws, and the new data is immediately visible.
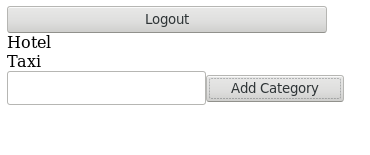
Here’s how it looks so far. Feel free to add some styling. 😉
Permissions
When you set up firestore, you set it up in ’test mode’, which means “everyone is permitted to do everything”. This makes early development easy, but it’s not useful for a production site. If you released your category creator as is, someone could easily add a category under someone else’s id. More alarmingly, they can access any and all your data or delete the whole works and wipe your business out.
In order to prevent malicious requests, you need to visit the Rules tab of your firestore database. It starts out looking like this. The default behaviour makes all documents readable and writable by everyone:
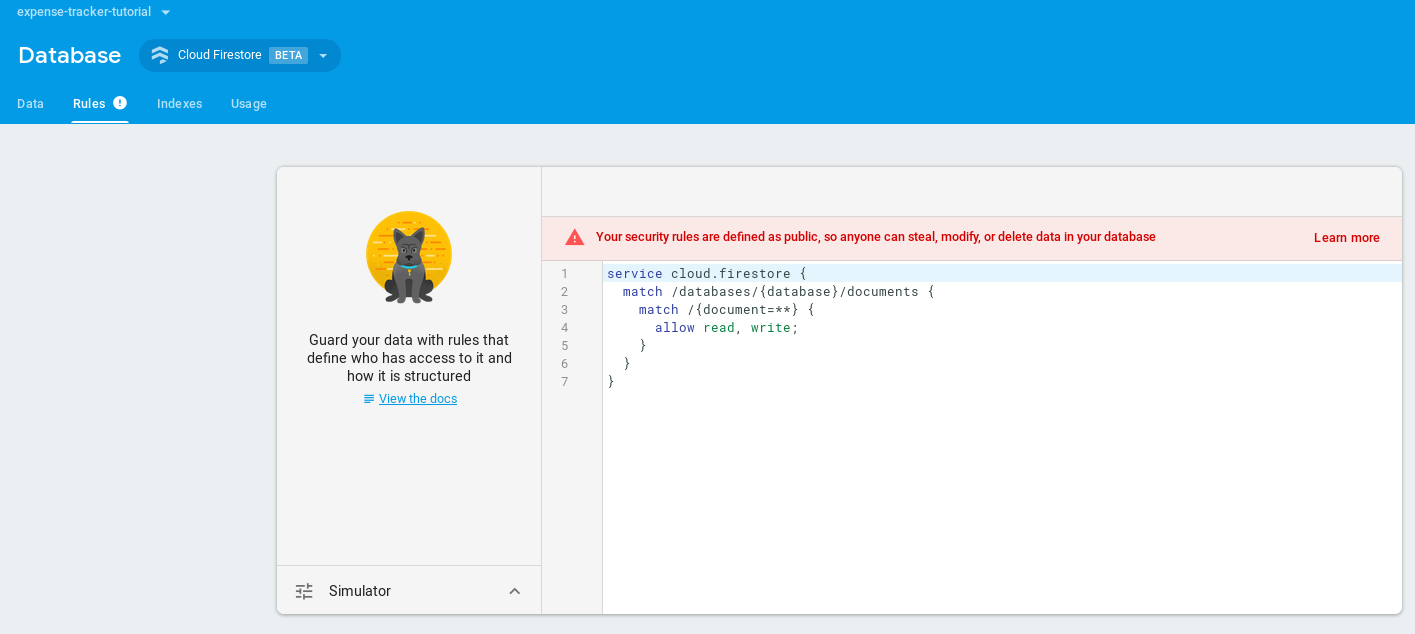
Manipulating firestore rules is definitely the hardest thing to do in firebase, but security usually is. I find the syntax unnecessarily obtuse, and the rules are hard to test, even with their simulator. The official documentation is comprehensive, but has a steeper learning curve than most things firebase.
Permissions on the user table
Start by locking down the users table such that only the currently logged in user can read or write their own data:
service cloud.firestore {
  match /databases/{database}/documents {
    match /users/{user} {
      allow read, write: if request.auth.uid == user;
      match /providerData/{pid} {
      	allow read, write: if request.auth.uid == user;
      }
    }
  }
}
The first two lines and associated closing brackets are the same for all firestore rules sections. The custom part is the `match.
The next line says, “if the request is for information in the users collection for a specific user represented by the {user} variable, then apply this rule. The {user} will be replaced with the id of a user document. Recall, that id was automatically generated when you first logged in.
The allow read, write: if request.auth.uid == user; line says that both reads and writes should be allowed if currently logged in user (represented by request.auth.uid) is the same as the id attached to the user document.
match /providerData/{pid} { is a nested rule. It matches the nested providerData collection on the user object. You can see the structure of this document in the third column of the database explorer if you select a specific user.
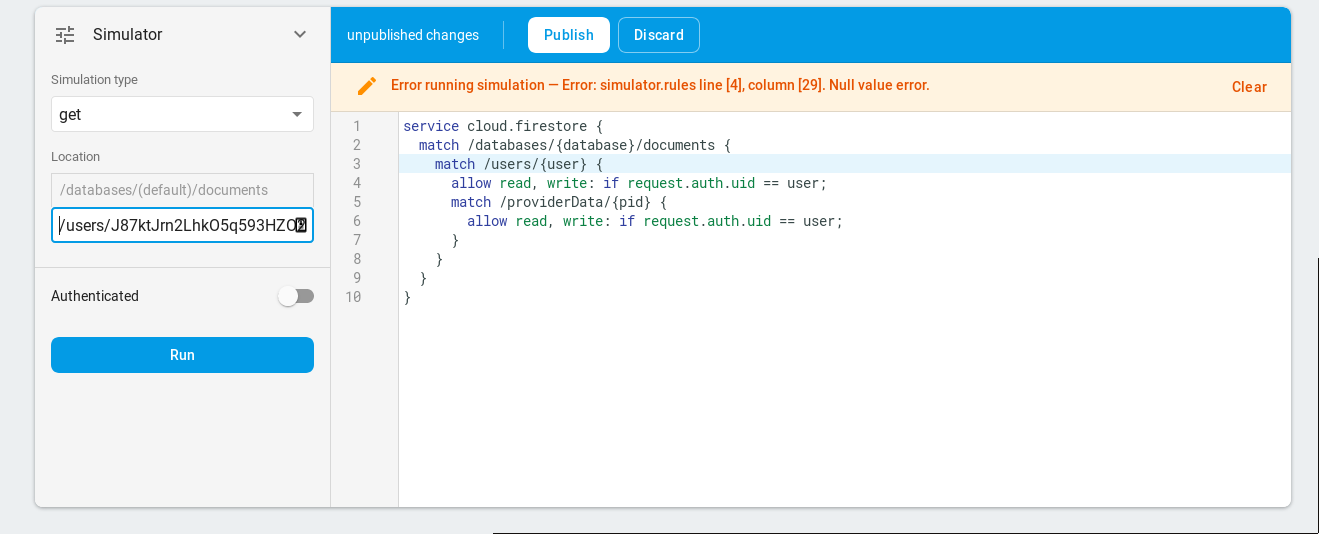
You can test the rules by clicking the Simulator button in the left column of the rules window. The simulator is a relatively new firebase feature. It has a couple bugs and uninformative error messages, and is hard to figure out, but it’s a lot better than testing in production.
Try putting /users/<your user id> in the Location field on the simulator, where <your user id> is the ID of the users document in your Database. Leave the Authenticated slider unticked for now.
If you click the Run button, it should show you an access denied error. At the time of writing, due to a bug in the simulator, it currently renders “Error running simulation”, but at least it’s not letting an unauthenticated user access the document:
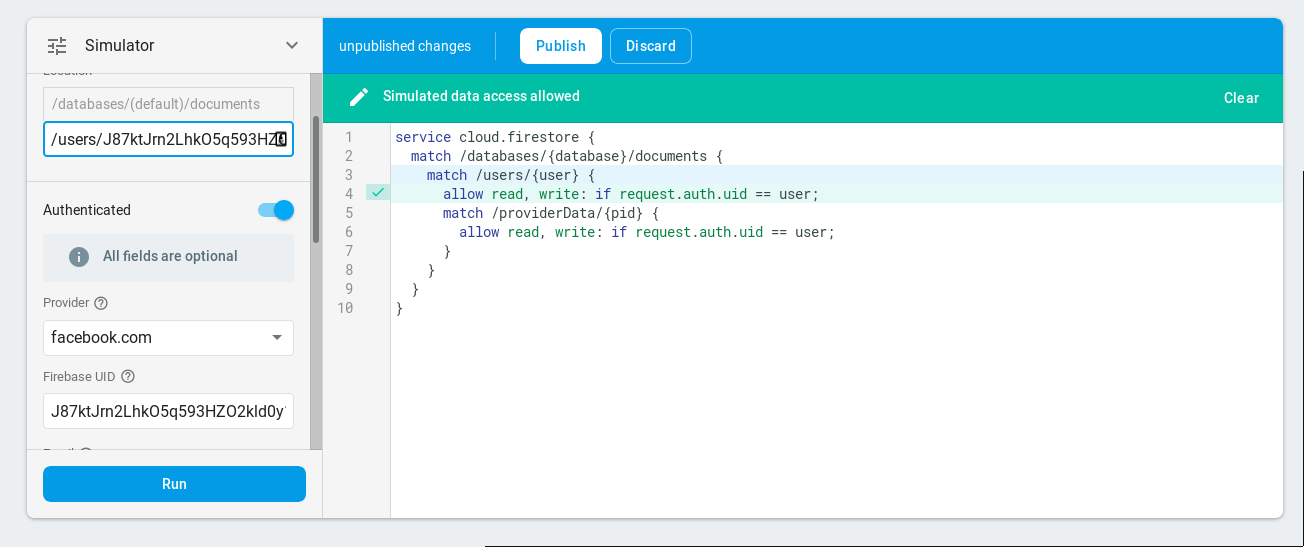
Now turn on the authenticated box and copy the same user id into the Firebase UID field. This simulates accessing the site as a logged-in user with that id. Since that user has read and write access to the document, it should now succeed:
You can also experiment with other simulation types (update or delete requests, for example). If you want to test the nested rule, try accessing a location like /users/<your user id>/providerData/email.
Once you’re satisfied the simulation is working, click the Publish button. It says it’ll take up to 10 minutes to propagate, but it hasn’t seemed to take more than a minute in my example apps (perhaps it depends how much data is in the database). Sadly, it doesn’t give you any feedback as to when it’s finished propagating, so you just have to guess.
In this case, you can actually test it by going back to your app and logging in and out a few times. At some point, the categories should stop showing up when you log in. This is because there is no rule to allow access the categories collection, so your user doesn’t see them anymore. However, you can still authenticate successfully because your user does have access to the users table.
Permissions on authorized objects
You can fix the categories not showing up bug by adding a second match rule for the categories collection:
service cloud.firestore {
  match /databases/{database}/documents {
    match /users/{user} {
      allow read, write: if request.auth.uid == user;
      match /providerData/{pid} {
      	allow read, write: if request.auth.uid == user;
      }
    }
    match /categories/{category} {
      allow create: if request.resource.data.uid == request.auth.uid;
      allow read, write: if request.auth.uid == resource.data.uid;
    }
  }
}
The thing to note here are the two magic variables:
request.resource.datarefers to the document that has been submitted by the user. In this case, we are only allowing a user to create a category if the user id they supplied is the same as the one they are logged in with. This prevents them from creating categories for other users.resource.datarefers to the document that already exists in the database. It is saying that a user can only access or update a resource if the resource in the database actually belongs to that user.
You can test these rules in the simulator. To test a read, try querying a Location such as /categories/9wlJFHBNVycAEuq9IRmb where the document id comes from the second column of your data explorer for the categories collection. If you set the simulator to be authenticated with the appropriate uid attached to that category it should approve it.
To test a create, change the Simulation type to create, and click Build document. Add fields for a name and a valid uid in your user’s database:
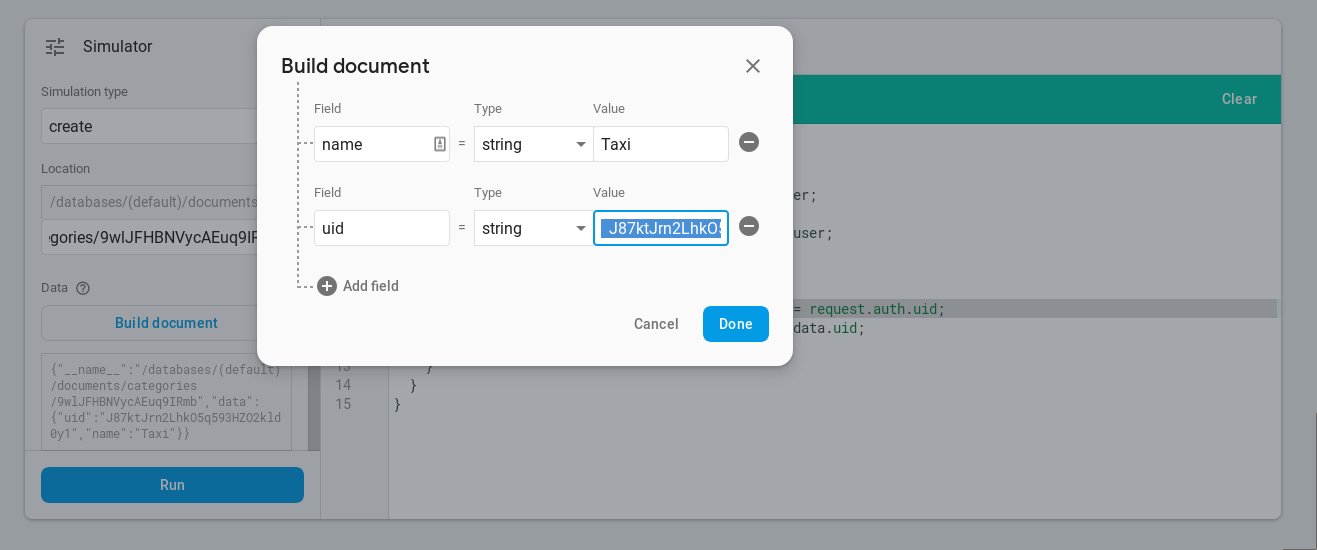
The simulation should succeed if authenticated with the same firebase userid, otherwise it should fail.
Publish the rules and refresh your react page a few times until the categories show up again and you can add new ones.
Normal redux actions
The firebase and firestore reducers that you combined into your rootReducer are no different from any other redux reducer; they accept state and action and return state. You can add new reducers just as you would in any redux app.
There are different strategies and helper libraries for structuring your reducers and actions, and I assume you already have a preferred methodology. For this tutorial, I’ll stick close to raw redux with minimal boilerplate. You can add selectors, immutability or action creators if that fits better with your workflow.
Add a reducer
For this example, there needs to be a way to select a category. This is not state that needs to be stored in the database, so you can just create a new reducer for it. Create a new file src/redux/categories.js to hold the new reducer:
//src/redux/categories.js
export const initialState = { selectedCategory: null }

export function reducer(state = initialState, action) {
  if (action.type === "selectCategory") {
    return { ...state, selectedCategory: action.category }
  }
  return state
}
You’ll need to update your src/redux/reducers.js to incorporate the new reducer:
//src/redux/reducers.js
import { combineReducers } from 'redux'
import { firebaseReducer } from 'react-redux-firebase'
import { firestoreReducer } from 'redux-firestore'
import { reducer as categoriesReducer, initialState as categoriesInitial } from './categories'

export const initialState = {
  categories: categoriesInitial
}

export const rootReducer = combineReducers({
  firebase: firebaseReducer,
  firestore: firestoreReducer,
  categories: categoriesReducer
})
Update the component
Now update the CategoryList component to highlight the selected category and to invoke the appropriate action if the user clicks a specific category.
First, add a new selectedCategory to the mapStateToProps in src/components/CategoryList.js. This references the state managed by the reducer you just defined:
const mapStateToProps = state => {
  return {
    uid: state.firebase.auth.uid,
    categories: state.firestore.ordered.categories ? state.firestore.ordered.categories.map(c => c.name) : [],
    selectedCategory: state.categories.selectedCategory
  }
}
Adjust mapDispatchToProps to pass in a function that can dispatch the selectCategory action:
const mapDispatchToProps = dispatch => {
  return {
    selectCategory: category => dispatch({ type: 'selectCategory', category })
  }
}
As a good citizen, you should update the propTypes for the CategoryList to reference the two new properties:
  static propTypes = {
    uid: PropTypes.string,
    categories: PropTypes.arrayOf(PropTypes.string),
    selectedCategory: PropTypes.string,
    selectCategory: PropTypes.func.isRequired,
  }
Finally, update the renderCategory method to do two things:
- add styling to highlight a background colour if the currently rendered category is selected.
- dispatch the
selectCategoryaction when the element is clicked
Here’s my version of the code. In production, you’d surely use CSS modules for the styling, but I’m skipping that as irrelevant to the topic at hand.
  renderCategory(category) {
    const styles = {
      padding: '1rem',
      cursor: 'pointer'
    }
    if (category === this.props.selectedCategory) {
      styles.backgroundColor = '#988afe'
    }
    return (
      <div
        key={category}
        style={styles}
        onClick={() => this.props.selectCategory(category)}>
        {category}
      </div>
    )
  }
With those changes in place, your browser should auto-refresh and you can click a category item to see it selected. You can look in the Redux Dev Tools to see the action issued and state updated. See Commit
Expenses data model
You already know enough to add an expense list to the app. Before implementing it, though, consider what the document model should look like. The goal is to have each expense attached to a single category, and to render a list of expenses associated with the currently selected category. I’m not yet an expert in how to structure data in a firestore database, but just off the top of my head I can think of three ways that this data can be structured:
- Collections You could make a new collection named
expensesthat would be queried and filtered separately. It would needuidandcategoryattributes to link it to the other collections, along with the expensedescriptionandcost. You’d need to add a new query to the expense list widget that filtered based on uid and selected category. - Subcollections You could add a subcollection which is like a top-level collection except it is associated with a specific document. In this case, the
expensessubcollection would be attached to an individual category. Subcollections are good for hierarchical data that needs to be queried or filtered independently. - Arrays The firebase array datatype allows you to store a list of values attached to a given document. Unlike a subcollection, you can’t query it independently. It can, however, be returned with the category query, so you don’t need to issue or manage separate queries (not that this is a difficult activity; redux-firestore takes care of it for you) and you can update the array independently.
I honestly don’t know which of these options is best. Any of them would work fine with the current use-case, so it would depend how and if you wanted to extend the app in the future. For example, if you were going to add a new trips collection so you could manage expenses across multiple trips, it makes a lot more sense to have a expenses collection with category and trip ids. In this case, subcollections are probably a bad idea, since you’d want to query expenses attached to categories in some views and attached to trips in others.
On the other hand, if you wanted to create more of a ‘monthly budget’ app, it might be better to use a subcollection so you could filter all the expenses in a selected category that are within a given date range.
If you did not expect to extend the application at all, you’d probably be better off using an array, as it would keep the code nice and simple.
My instinct is to go with top-level collections because it seems most flexible to meet future needs. However, I acknowledge that this instinct is influenced by my experience with relational databases, which would obviously store expenses in a new top-level table. At any rate, that’s the model I’m going with. Each document in the expenses collection will look like this:
{
  uid: "<id>",
  description: "First night in hotel",
  category: "Hotels",
  cost: "214.15"
}
Note: I should probably be storing category id instead of name here for a wide variety of reasons, but I didn’t want to complicate the tutorial by plumbing the id through the components.
Before creating the expense components, you’ll need to update the security rules to allow access to expenses. The match rule is virtually identical to that for categories:
    match /expenses/{expense} {
      allow create: if request.resource.data.uid == request.auth.uid;
      allow read: if request.auth.uid == resource.data.uid;
    }
Expense components
The src/components/AddExpense.js component is extremely similar to the AddCategory form. It has extra support for the redux selectedCategory and only renders itself if a category is selected. The form also needs a second input element for the expense value. Otherwise, very little has changed from my (gasp) copy-pasted code:
//src/components/AddExpense.js
import React, { Component } from 'react'
import PropTypes from 'prop-types'
import { connect } from 'react-redux'
import { compose } from 'redux'
import { firestoreConnect } from 'react-redux-firebase'


class AddExpense extends Component {
  static propTypes = {
    uid: PropTypes.string,
    selectedCategory: PropTypes.string,
    firestore: PropTypes.shape({
      add: PropTypes.func.isRequired
    }).isRequired
  }
  state = { description: '', cost: 0 }

  addExpense() {
    this.props.firestore.add(
      { collection: 'expenses' },
      {
        uid: this.props.uid,
        description: this.state.description,
        cost: this.state.cost,
        category: this.props.selectedCategory
      }
    )
    this.setState({ cost: 0, description: '' })
  }

  render() {
    if (!this.props.uid) return null
    if (!this.props.selectedCategory) return null

    return (
      <div>
        <input
          type="text"
          value={this.state.description}
          onChange={(evt) => this.setState({ description: evt.target.value })}
        />
        <input
          type="number"
          value={this.state.cost}
          step="0.01"
          onChange={(evt) => this.setState({ cost: evt.target.value })}
        />
        <button onClick={(evt) => this.addExpense()}>Add Expense</button>
      </div>
    )
  }
}

const mapStateToProps = state => {
  return {
    uid: state.firebase.auth.uid,
    selectedCategory: state.categories.selectedCategory
  }
}

const mapDispatchToProps = {}


export default compose(
  connect(mapStateToProps, mapDispatchToProps),
  firestoreConnect(),
)(AddExpense)You can test this by temporarily adding the <AddExpense /> component to src/App.js. Select a category and add a description and expense. It should show up in the database explorer after a page refresh on the datastore (firestore only automatically updates when documents are added; you have to refresh it to see new collections).
Now all you need is a list of expenses. As with AddExpense, the ExpenseList component is very nearly a copy/paste of CategoryList. It would definitely be better to refactor this into a generic ’list’ component that accepts a component to render the individual list items. I’ll leave that to you, though, since this tutorial is about accessing firebase, not writing exceptionally well-organized react code.
ExpenseList is actually simpler that CategoryList, since you don’t need to distinguish between selected expenses. As result, there are no actions to dispatch. The only thing that is really different is you need to filter the expense query based on the selectedCategory. Here’s the whole component for completeness, but you’ll want to focus on the firestoreConnect call:
import React, { Component } from 'react'
import PropTypes from 'prop-types'
import { connect } from 'react-redux'
import { compose } from 'redux'
import { firestoreConnect } from 'react-redux-firebase'

import AddExpense from './AddExpense'


class ExpenseList extends Component {
  static propTypes = {
    uid: PropTypes.string,
    expenses: PropTypes.arrayOf(PropTypes.shape({
      key: PropTypes.number.isRequired,
      description: PropTypes.string,
      cost: PropTypes.string
    })),
    selectedCategory: PropTypes.string,
  }

  renderExpense({ key, description, cost }) {
    return (
      <div key={key}>
        <span style={{ display: "inline-block", width: '20rem' }}>{description}</span>
        <span>{cost}</span>
      </div>
    )
  }

  render() {
    const expenseItems = this.props.expenses.map(
      (e) => this.renderExpense(e)
    )
    return (
      <div>
        <div>
          {expenseItems}
        </div>
        <AddExpense />
      </div>
    )
  }
}

const mapStateToProps = state => {
  return {
    uid: state.firebase.auth.uid,
    expenses: state.firestore.ordered.expenses
      ? state.firestore.ordered.expenses.map((t, idx) => {
        return { key: idx, description: t.description, cost: t.cost }
      })
      : [],
    selectedCategory: state.categories.selectedCategory
  }
}

const mapDispatchToProps = {}


export default compose(
  connect(mapStateToProps, mapDispatchToProps),
  firestoreConnect((props) => {
    if (!props.uid) return []
    if (!props.selectedCategory) return []
    return [
      {
        collection: 'expenses',
        where: [
          ['uid', '==', props.uid],
          ['category', '==', props.selectedCategory]
        ],
        orderBy: ['cost', 'desc']
      }
    ]
  }
  )
)(ExpenseList)
The where clause now has a second conditional so that only expenses assigned to the current user and the selectedCategory are returned. The where clause in firestore is not as robust as you may be used to in relational databases. It can support <, <=, ==, >, >=, or array_contains queries, but not much else. You can combine two inequalities to get a range or not equal query, but only on a single field. This is my biggest concern about firestore. I suspect there are situations where you’ll have to query a lot of data and do extra filtering client side in order to select the data you really want. However, firestore is still beta, so perhaps there are more filters coming.
I’ve also added an orderBy clause to the query in order to illustrate one more Firestore gotcha. It may not make a lot of sense to order expenses by cost, but it’ll do for demo purposes. First, add the <ExpenseList /> component to src/App.js as follows:
class App extends Component {
  render() {
    return (
      <Provider store={store}>
        <div>
          <AuthButton />
          <CategoryList />
          <ExpenseList />
        </div>
      </Provider>
    )
  }
}Create an index
Now open the console and select a category that has had an expense added to it. The console will show an error similar to this:

The problem is that firestore doesn’t know how to combine the where and orderBy clauses without building an appropriate index on the database. This may be a bit annoying, but at least they actually tell us when we need an index. That seems much more civilized than the black art that is relational database index tuning!
Note: This tripped me up: In order for the logging error to be visible, you need to make reduxFirestore comes before reactReduxFirebase in the enhancers list in your src/redux/store.js. I made sure you did this already when I presented src/redux/store.js, but I wanted to highlight it in case you encounter a “my orderBy data isn’t showing up and there is no error message” moment in the future.
const enhancers = [
  reduxFirestore(firebase),
  reactReduxFirebase(firebase, {
    userProfile: 'users',
    useFirestoreForProfile: true,
    enableLogging: true,
  }),
]
If you copy the provided URL into your browser, you should see exactly what index needs to be created:
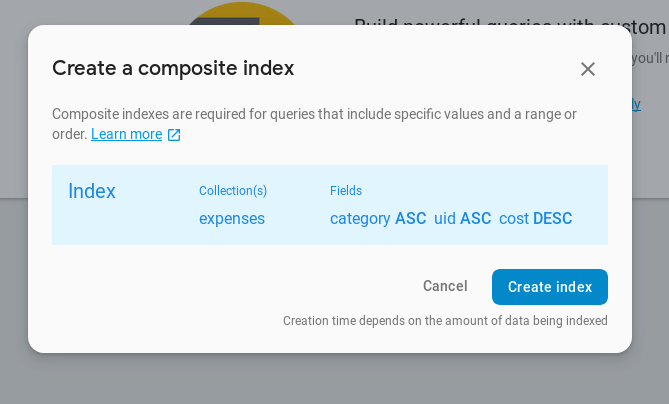
Click that Create Index button and wait for the status to change from building... to enabled. This will take a few minutes, even if there’s very little data in your database.
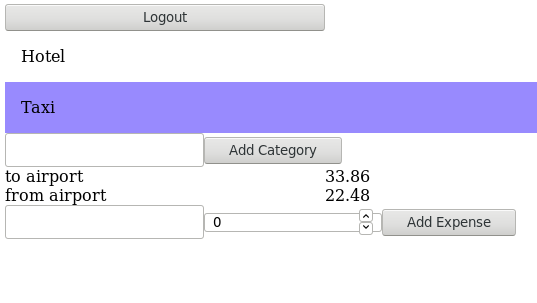
Now you should be able to select a category and see the expenses for that category show up in your code. If you select a different category it updates to the expense list for that category. In other words, the app should behave exactly as expected!
Clearing the firestore cache
Well, almost exactly as expected. If you log out of the app, you’ll notice that the AuthButton logs out appropriately, but the expenses and categories stay visible. react-redux-firebase doesn’t automatically clear the firestore state when you log out, so you need to do that manually. Luckily, redux-firestore provides a redux action for that, so it’s easy:
First, update mapDispatchToProps in src/components/AuthButton.js to add a prop that issues a CLEAR_DATA action to redux-firestore:
const mapDispatchToProps = dispatch => {
  return {
    clearFirestore: () => dispatch({ type: '@@reduxFirestore/CLEAR_DATA' })

  }
}
You’ll also want to add a clearFirestore: PropTypes.func.isRequired to the propTypes object.
Second, attach this action to the onClick action on the Logout button:
    return (
      <button
        style={{ width: "20rem" }}
        onClick={async () => {
          await this.props.firebase.logout()
          this.props.clearFirestore()
        }}
      >
        Logout
      </button >
    )
I used async/await syntax here, but you can use a promise if you prefer, as in onClick={() => { this.props.firebase.logout().then(this.props.clearFirestore()) }}.
##Hints and next steps
That’s the whole tutorial. I hope you’ve enjoyed it and that you are up and running with react-redux-firebase in less time than it did for me 🙂. I certainly didn’t cover everything you’ll need to know to do production coding using the library, but you should be in a position where the official documentation for react-redux-firebase, redux-firestore, and firestore will help you stay unblocked. All three projects have extensive documentation, but they don’t always answer the obvious questions.
The redux-firestore API very closely mirrors the original javascript firestore API as provided and documented by Google. A few of the methods have an altered API so they can be used with action dispatching. When I’m trying to figure out how to do something, I read the redux-firestore documentation first, followed by the react-redux-firesbase documentation and recipes for firestore. If that doesn’t answer my question, I read the firebase documentation and figure out how to map it back to the redux-firestore API.
At some point, you will encounter a naming conflict where you have two different queries asking for information about the same collection. You’ll need to make use of the storeAs option to firestore queries to solve this.
I didn’t cover the firebase storage API at all, in fact I haven’t used it. However react-redux-firebase does have bindings to it if you need it.
As your serverless application becomes more complex, you’ll almost certainly need to learn how to use firebase functions. These run on Google’s infrastructure when certain events happen.
Look through the firestore object in the Redux devtools extension. You’ll see that it provides information about the state of each query, so you can, for example, show a ’loading’ symbol if the data is not yet available.
